ARES 21 Operating Instructions
Note on these instructions:
Scoreboard->On
means click the Scoreboard menu, and then select On
Ctrl+Insert
means press Ctrl and Insert at the same time
Setting Up the Pool
Setting up and testing the electronic timing system can take some time - you need to arrive at the pool in plenty of time to set up and test the system before the start of the warm up.
- Each lane will need:
- A timing pad
The top of the pad should be place under the starting block, and the starting block screwed down firmly. Ensure that the pad is fitted flat against the end of the pool.
Connect the cable to the top left pair of holes in the deck plate.
- A backup button
Connect the backup button to the middle left pair of holes in the deck plate. Feed the button through the side of the block and leave it out of the way to one side.
- A timing pad
- Starting system:
- Unplug the StartTime from the charger in the Club Room
- Place the StartTime on the first level of tiles seating next to the alcove, pointing the loudspeaker end towards the pool.
- Connect the microphone (in the cupboard) to the StartTime - the small connector
- Connect one end of the start cable to the
ARES
socket on the StartTimer, and the other end to theStart
socket on the ARES 21 box. If all starts will be from the near end of the pool, it is a good idea to securely tape down the cable to ensure no one trips over it. If there will be some starts from the far end of the pool, ensure that there is sufficient loose cable in the alcove to reach the flags at the far end of the pool. You will need a chair at the far end of the pool to put the StartTime on. - Turn on the StartTime
- ARES Control Station:
- Place a table from the Club Room on the top step of the spectator seating.
- You will need:
- The ARES box
- The laptop computer
- The club Samsung laser printer (plus the USB connecting lead)
- The charger/power supply for the ARES
- The box of cables kept on top of the cupboard in the club office
- Plug the extension cable into the power socket in the alcove, and tape it down to the table. Plug the four-way strip into it.
- Connect the serial port on the laptop to the PC port on the ARES box
- Connect the Scoreboard connector on the ARES box to the Scoreboard connector hanging from the scoreboard, using one of the 25m cables. Loop the cable through the white fixings around the wall.
- Connect the HA-1 connector on the ARES box to the Harness connector on the wall
- Plug the Samsung printer into the
USB
connector on the laptop computer - Connect the ARES power supply to the
Main power
connector on the ARES box, and to the four-way strip. - Plug the mouse and power supply into the laptop
- For on-line operation connect the on-line connector (looks like a telephone cable) to the DH connector (Data Handling) on the ARES box and into the serial port of the results computer.
- Switch on the ARES box with the switch on the back
Setting up the computer
- Turn on the computer and wait while Windows starts
- Double-click the Swimming icon on the Desktop to load the ARES software
- A window will appear headed
Select data directory
. Type the name of the directory that will be used to store the gala database. This should be:\aresdb\year\month\day-galaname, e.g.\aresdb\2002\09\07-internal. Click onCreate
and thenOK
.
If you want to reload the details from a previous gala, type the directory from the previous gala here instead and then clickOK
. -
Before doing anything else, the time must be set on the ARES system. To do this,
select the
IF-ARES
menu, and thenSynchro
. Check that the time shown is correct, and selectdirect
from the list of sources. Click onGo
to set the time.
Testing
If something does not work correctly, refer to the Troubleshooting section.
- To test the connection to the scoreboard, select
Scoreboard->Daytime
. The time should be displayed on the scoreboard. After doing this, selectScoreboard->Off
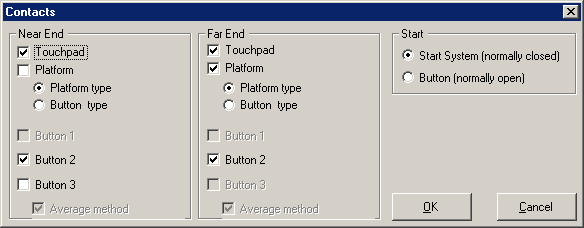
to clear the scoreboard. - The rest of the connections can be tested using the built-in test screen. Select
Configuration->Pool
, and then clickTest
. Turn the computer round and angle the screen down towards the pool. Check that as each pad and backup button is pressed, the correct lane number is displayed on the screen.
The same screen can be used during warm-up to continue testing. - A "Test race" should now be run to ensure that everything is working.
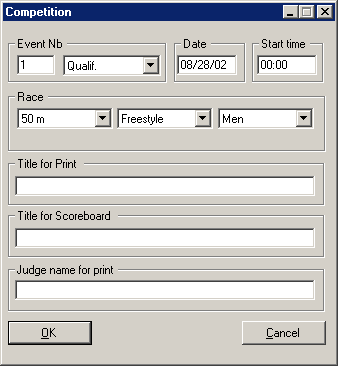
- In the
Timetable
window click on the+++
line, and then click theEdit competition
button. - Enter 999 as the event number, and set it to be a 50m race - the rest of the settings do not matter.
- Click
OK
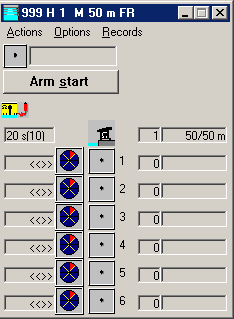
- Click the
Race
button - Reset the printer (
IF-ARES->Printer->Reset
) and then turn it on (IF-ARES->Printer->On
). - Select
Scoreboard->On
. The scoreboard should display0.0 - Hold down the left button on the Microphone and talk to make sure that the speaker volume is set correctly. Adjust the volume as necessary.
- Press the right button to start the race.
- The scoreboard should start counting up.
- After 20 seconds, go across the pool touching each pad and pressing the back-up button.
- Press F12 to send the result to the printer
- Turn off the printer (
IF-ARES->Printer->Off
). - Close the
Race
window.
Result
window should show a primary and backup time for each lane. The printer should have printed the result. - In the
Note: Ideally all these tests should be completed before the start of the warm-up. However, if you are short of time do not delay the start of the warm-up. The first two be tests can run during the warm-up and should detect any problems.
Setting up the Gala ProgrammeBefore the start of the gala the list of events must be entered into the system.
|
|
Running the gala
|
|
Moving the Start
- Where the competition includes 25m events you will be required to move the StartTime to the far end of the pool for these events. It is a good idea to enlist the help of the starter in doing this.
- The StartTime can be moved as soon as the previous race has started. Doing this ensures that the gala is not delayed.
- Press the power button to turn off the StartTime and pull out the microphone and ARES cable.
- Take the StartTime to the far end of the pool and place on a chair near the flags, with the speaker pointing towards the end of the pool. Ensure that the strobe on top of the StartTime is not obscured and that the timekeepers have a clear view of it.
- Carefully lay the cable along the poolside at the bottom of the spectator area, ensuring that it is pushed as far back as possible. If there are a large number of 25m events at the beginning or end of a gala/session it may be worth taping down the cable across the emergency exit to/from the lesuire pool area.
- Plug the cable and microphone in to the StartTime but do not turn on the StartTime until the previous race has finished.
- Turn on the StartTime and then check the computer to make sure that the system is ready to start - there should be a tick in the top left of the Race window.
- Indicate to the Referee that you are ready to continue
At the end of the gala
- Select
Scoreboard->Off
to turn off the scoreboard - Close the ARES Swimming Program, and shut down the computer
- Turn off the ARES box and StartTime
- Disconnect all the wires, and coil up tidly. Return them to the box and put it back in the club office.
- Plug the StartTime into the charger in the club room
- Plug the printer into the charger in the club room
- Plug the ARES power supply into the charger in the club room
- Remove all the backup buttons and coil up tidly.
- Remove the pads from the pool, allow to dry (or wipe down with the towel) and put in the club office. Please ensure that pads are leant evenly along the top to ensure the pressure sensor does not get damaged, and that the cables are left flat.
- Return all tables to the club room
- Inform Mike Lambert if there were any problems you could not solve
Troubleshooting
- One of the pads/backup buttons isn't working
- Unplug it, wipe off the pins with a piece of tissue and plug it back in again.
- If this does not work, inform the referee that the pad is not working. In some competitions they may choose to swap it to an outside lane. Mark the pad with a piece of tape around the cable, and inform Mike Lambert that there may be a problem with it.
- If it is a backup button, ask the Chief Timekeeper to check that the Timekeeper is pressing the button properly.
- I press a key but it doesn't do anything
You must have theRace
window selected to use the keyboard
- Something else isn't working
Check all settings against the list below. If there is still a problem, inform Mike Lambert.
Keyboard Quick Reference
Ctrl+Insert
Scoreboard onCtrl+Home
Scoreboard OffCtrl+PageUp
Show results on ScoreboardF12
Send results to printer1
thenb
Select backup time for lane 11
thenu
Set Lane 1 as used/unusedCtrl+T
Next eventCtrl+N
Next heat1
then+
Add a lap to lane 11
then-
Remove a lap from lane 1
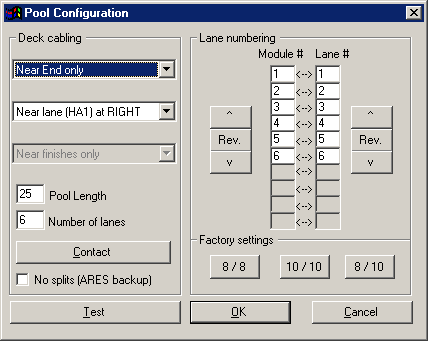
Configuration
It should not be necessary for you to change any of the settings. However, if something does not work correctly, check the settings against the list below.
Pool
Note: this screenshot needs to be updated to reverse the modules due to confusing installation
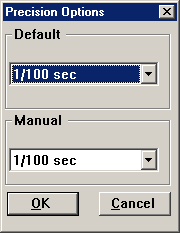
Precision
|
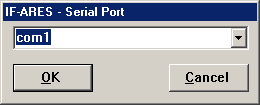
Serial Ports->Scoreboard
Serial Ports->PC<>IF-ARES
|
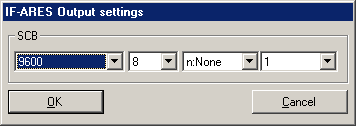
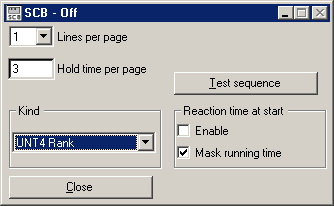
ScoreboardNote: this screenshot needs to be updated to show the settings for the new scoreboard
|
|
Updated 3 September 2003
- Removed references to spare pad
- Added instructions for moving StartTime to the far end of the pool
- Updated scoreboard instructions to take account of new Picollo scoreboard